In this tutorial, we’re going to create a simple Gutenberg extension that lets users control any Gutenberg block visibility on their website. As simple as this may sound, It can be a very useful feature for many users.
Pre-requisites
- Gutenberg Block Filters: Some basic knowledge about Gutenberg block filters.
- React.js: Some basic knowledge about react.js.
- Gutenberg Blocks: Some basic knowledge about Gutenberg blocks.
The goal of this Gutenberg block visibility extension
It’s always good to understand upfront what a tutorial is going to achieve at the end of the day. Controlling block visibility based on various conditions is a very powerful feature for a user. For example, a user may want to conditionalize Gutenberg block visibility based on many conditions, here are some example conditions below.
1. Controlling block visibility based on Different Screen Sizes
Controlling block visibility on different devices, and screen sizes.
Editorskit & EditorPlus also provides a way to toggle block visibility based on screen sizes.
2. Controlling block visibility based on Post Metadata
Controlling block visibility when a particular condition is met with the post metadata.
3. Controlling block visibility based on Specific User Roles
Display block conditionally based on a particular user role like Subscriber, Customer, or Administrator.
4. Controlling block visibility based on Url Query
Display block when a certain URL query is satisfied.
In this tutorial, we’re only going to handle Gutenberg block visibility based on different screen sizes (i.e desktop, tablet, and mobile). But, you can go ahead and try creating other conditions as well, this reminds me of a quote
Programming isn’t about what you know; it’s about what you can figure out.
Chris Pine
Planning the User interaction
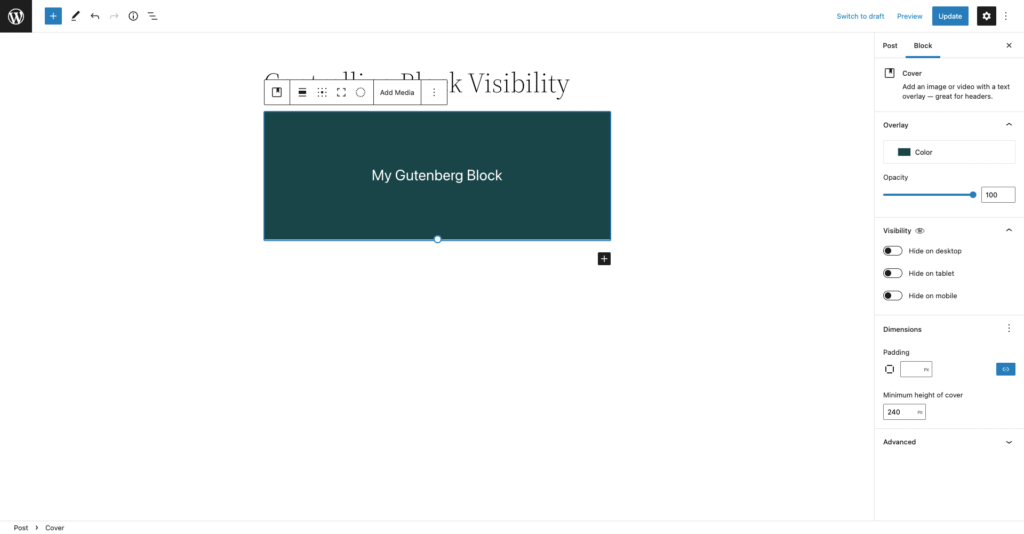
As I’ve mentioned in my previous tutorials, planning user interaction is an important part of software development, the same goes for Gutenberg extensions. In our case, the user should be able to easily modify any block visibility.
The user inserts a Gutenberg block
↓
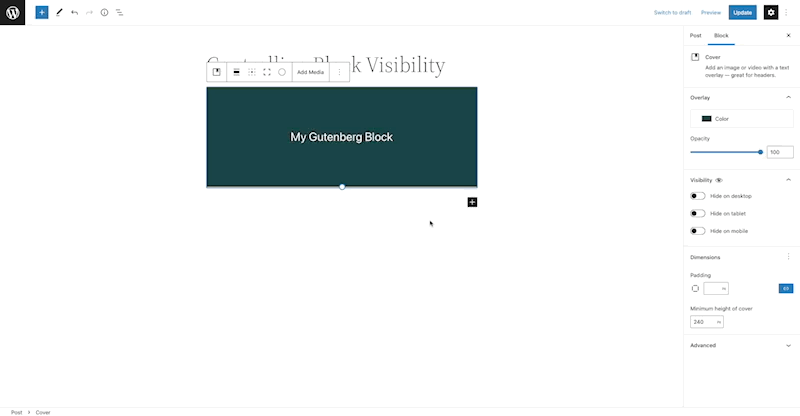
User modifies visibility from inspector controls
↓

The user saves the post
Getting Started
As we’ve covered all the basic details, In order to get started, use this starter template “CakeWP/gutenberg-extension-starter-template” for quickly creating Gutenberg-based plugins.
Extending attributes in existing Gutenberg blocks
We need to extend each Gutenberg block with 3 additional attributes (described below) using a block filter blocks.registerBlockType
// src/index.js
import { addFilter } from "@wordpress/hooks";
// src/index.js
const addAttributes = (settings) => {
if (typeof settings.attributes !== "undefined") {
settings.attributes = Object.assign(settings.attributes, {
hideOnDesktop: {
type: "boolean",
default: false,
},
hideOnTablet: {
type: "boolean",
default: false,
},
hideOnMobile: {
type: "boolean",
default: false,
},
});
}
return settings;
};
addFilter(
"blocks.registerBlockType",
"block-visibility/add-attributes",
addAttributes
);The extended attributes are basically self-explanatory, still, here’s a one-line explanation for each extended attribute:
hideOnDesktop: Boolean attribute which stores block visibility status for desktop devices.hideOnTablet: Boolean attribute which stores block visibility status for tablet devices.hideOnMobile: Boolean attribute which stores block visibility status for mobile devices.
Adding block visibility controls
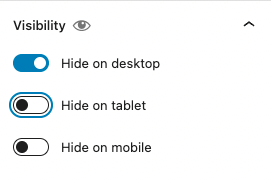
Now we need to provide users a way to modify these extended attributes. Inspector Controls (Slotfill for block settings sidebar) is a great place for adding block-related options. It’s time to use another Gutenberg block filter editor.BlockEdit which allows us to extend/supercharge a Gutenberg block in the block editor.
// src/index.js
import { createHigherOrderComponent } from "@wordpress/compose";
import { PanelBody, ToggleControl } from "@wordpress/components";
import { InspectorControls } from "@wordpress/block-editor";
// src/index.js
const withInspectorControl = createHigherOrderComponent((BlockEdit) => {
return (props) => {
const { attributes } = props;
const { hideOnDesktop, hideOnTablet, hideOnMobile } = attributes;
return (
<>
<BlockEdit {...props} />
<InspectorControls>
<PanelBody
icon="visibility"
title={__("Visibility", "block-visibility")}
>
<ToggleControl
checked={hideOnDesktop}
label={__("Hide on desktop", "block-visibility")}
onChange={() =>
props.setAttributes({ hideOnDesktop: !hideOnDesktop })
}
/>
<ToggleControl
checked={hideOnTablet}
label={__("Hide on tablet", "block-visibility")}
onChange={() =>
props.setAttributes({ hideOnTablet: !hideOnTablet })
}
/>
<ToggleControl
checked={hideOnMobile}
label={__("Hide on mobile", "block-visibility")}
onChange={() =>
props.setAttributes({ hideOnMobile: !hideOnMobile })
}
/>
</PanelBody>
</InspectorControls>
</>
);
};
}, "withInspectorControl");Applying our filter.
// src/index.js
addFilter(
	"editor.BlockEdit",
	"block-visibility/with-advance-controls",
	withInspectorControl
);
Modifying Gutenberg block visibility on the front end
Now that we’ve registered basic attributes, and also provided a way for users to modify these attributes. It’s about time to utilize these extended attributes to conditionalize the Gutenberg block visibility on the front end.
Here comes our third and last Gutenberg block filter blocks.getSaveContent.extraProps which allows us to add additional attributes to an existing Gutenberg block save wrapper.
A block validation error can occur when using this filter because the editor verifies the content stored in the post matches the content output by save() function. To avoid this validation issue, You can use the server-side implementation render_block.
Now let’s add visibility classes to the Gutenberg block based on our custom extended attributes.
// src/index.js
const addVisibilityClasses = (extraProps, blockType, attributes) => {
	const { hideOnDesktop, hideOnTablet, hideOnMobile } = attributes;

	extraProps.className = classnames(extraProps.className, {
		"hide-on-desktop": hideOnDesktop,
		"hide-on-tablet": hideOnTablet,
		"hide-on-mobile": hideOnMobile,
	});

	return extraProps;
};
// src/index.js
addFilter(
"blocks.getSaveContent.extraProps",
"block-visibility/add-visibility-classes",
addVisibilityClasses
);Let’s target all blocks based on these custom classes, and add necessary visibility through CSS. We’re using custom media queries that can be adjusted as per your need.
/** src/style.scss **/
@media only screen and (min-width: 1100px) {
	.hide-on-desktop {
		display: none !important;
	}
}
@media all and (min-width: 500px) and (max-width: 1100px) {
	.hide-on-tablet {
		display: none !important;
	}
}
@media screen and (max-width: 500px) {
	.hide-on-mobile {
		display: none !important;
	}
}
Wrapping Up
Let’s wrap up this tutorial with an example.
This is how the final result looks in the front-end
Feel free to ask anything 🙂
If you’ve any sort of difficulty following this tutorial. Query comments are most welcome, feel free to comment anything that troubles you from following this tutorial.


Leave a Reply